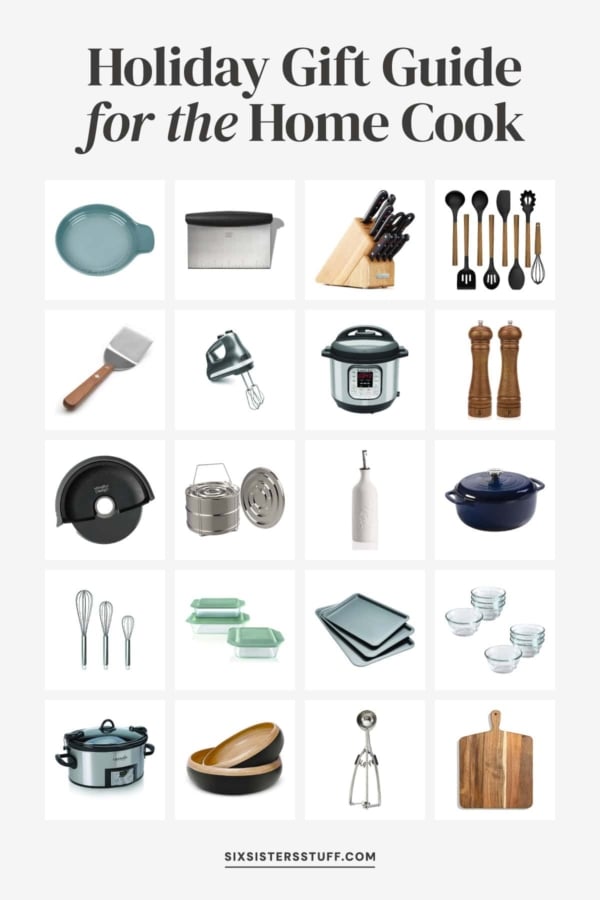
Have you heard of the incredibly talented Eddie Ross? A couple of years ago, he posted about making an ornament wreath using only ornaments and a wire hanger . . . I immediately was drawn to it because it didn’t require me gluing a thousand ornaments to a wreath form!
I finally got around to making my wreath this year . . . it only took 30 minutes and cost me $6! I found my ornaments at Dollar Tree (gotta love the dollar stores!). Want to make your own? Here’s how I did it:
Supplies you’ll need to make your wreath:
-wire hanger
-about 80 ornaments (the ornaments from Dollar Tree come in packs of 12, so I bought 6 packs and then I also used about 8 tiny ornaments from my daughter’s small tree . . . don’t tell her I took them!)
-pliers
-glue gun (just in case! I only had to use it on 2 ornaments!)
-thick wired ribbon that has the same print on both sides- you will want about 6-9 feet, depending on how big you want your bow to be
-skinny craft wire to tie your bow
1. Bend your wire into a circle (try to get it as close to a circle as you can!).
2. Untwist the wire at the top (I had to use pliers because I am weak!).
3. String your ornaments on one by one.
4. Push your ornaments together as close as you can so that the wire doesn’t show through.
I kind of felt like it was a puzzle- I would just try to put each ornament at a different angle around the hanger.
Just keep stringing . . . just keep stringing . . .
Pretty soon it will start to look like this!
Occasionally you might have an ornament that pops off- just a drop of hot glue on that sucker will do the trick! (Eddie suggests gluing each ornament before starting the stringing process, but my ornaments were pretty sturdy!).
About half way done!
5. When you have strung all your ornaments on, use your pliers to twist the hanger back together.
Ta-da! Now we need to hide that lovely hanger hook . . .
6. Using wired ribbon that is about 2 inches wide, wrap it around the wreath and hook two times so that the hook is completely hidden.
7. Glue the ribbon end down on the back side of the hook.
See- there is the hook! All wrapped up nice and tight!
Now for the bow:
Make a loop on one end of the ribbon (each of my loops used about 8 inches of ribbon- I wanted a big bow!). If you want “tails” to your bow, make sure you leave enough extra ribbon at the end.
Directly across from that loop, make another loop (so if you looked at this on it’s side, it would look like a figure 8. You want your ribbon to have the same print on both sides, otherwise the print will only show up on half of the loops).
Now make another loop across from your last loop, but make it at an angle. I like to think of it as making a letter “x”.
Make another loop across from your last one to finish your letter “x”.
You can stop here or you can add one more loop like I did . . . just make another “x”.
When you are finished with all your loops, “scrunch” it in the middle with your fingers nice and tight.
Wrap some wire around the middle of the bow. The tighter, the better! Some people even use pliers to get it as tight as they can.
Now here’s your bow! Trim your tails to the length you want them and clean up the ends a little bit.
Now to cover up the wire in the middle of the bow, take a piece of ribbon that is about 6 inches long and tie a knot in the middle of it.
Glue that knot down in the middle of the bow using hot glue.
Wrap the ends back behind the bow and glue them down (you will also have to trim them).
Trimmed and glued!
Once you have glued the knot down, you are ready to glue the bow to the wreath- I glued mine right in the middle of the ribbon that I wrapped around the hook.
Here it is in all it’s glory!
Not too bad for 30 minutes and $6, eh? 🙂
Let me know if you have any questions or need me to explain anything else!
http://infinitelifefitness.com
http://mscomposure.blogspot.com
PS- Here's the two I made.. I had trouble with the bows, so I kind of winged it lol..
http://p.twimg.com/AgrsQ3yCEAAFmcY.jpg
http://p.twimg.com/AgrsJUvCIAAPVKF.jpg
Danielle @ Blissful & Domestic
http://blissfulanddomestic.blogspot.com/
xo,
Laurie @ Gallamore West