
Want to make a kid-friendly charcuterie board? It’s simple and fun with these instructions!
I have been loving all of the charcuterie boards that I have seen floating around Pinterest – I love all things meat and cheese. I decided that I wanted to make one for my family, but soon realized that there weren’t many ideas out there on how to make a board with kid-friendly foods. So today, I am sharing the charcuterie board that I made for my family.
We actually make one each Christmas day – I make it for lunch and we snack on it as needed. This is a great way to make a hassle-free meal for the New Year parties, weekend snacking, and when you just need to get something healthy on the table for your whole family.
With people coming and going all day, it made the perfect food that was available at any time. What better way to celebrate a holiday with your loved ones?
What is a charcuterie board?
Charcuterie is basically the art of preparing meats which are often cured or smoked (such as bacon, ham or salami). A charcuterie board is commonly seen on menus as a platter of meats and cheeses, commonly paired with crackers, vegetables, fruits, nuts . . . anything goes!
Recipe Ingredient Notes
A good charcuterie board has everything you and your family love – so don’t be afraid to make it your own. The awesome thing about charcuterie boards is that anything goes! Want a breakfast charcuterie board? Great idea! Want to include animal crackers, cherry tomatoes, colby jack cheese, cheddar cheese cubes, and sweet treats? Go for it!
This cheese board can be made with any cheese you like, hard cheese, soft cheese, blue cheese, or even goat cheese, the options are limitless. In addition the cheese and cracker options, I like to add fresh fruit for a bit of creative flavor and to add a great option for something sweet. The different shapes on the board will leave your kids intrigued, and interested in trying each option.
For the perfect appetizer, I recommend choosing a large board so that you can spread each option in a way that delights the eye and is delicious to the taste. For an adult board you might have fresh herbs, dried fruits, cheese knives, and charcuterie meats, but remember that you want this board to be kid-friendly. The kind of cheeses you choose may be the easiest way to impress your kids.
To make a kid-friendly charcuterie board, you will need a variety of ingredients:
- Dips: ranch dressing, hummus, salsa, guacamole.
- Cheeses: Swiss cheese, sharp cheddar cheese, Gouda cheese, Havarti cheese, pepper jack cheese.
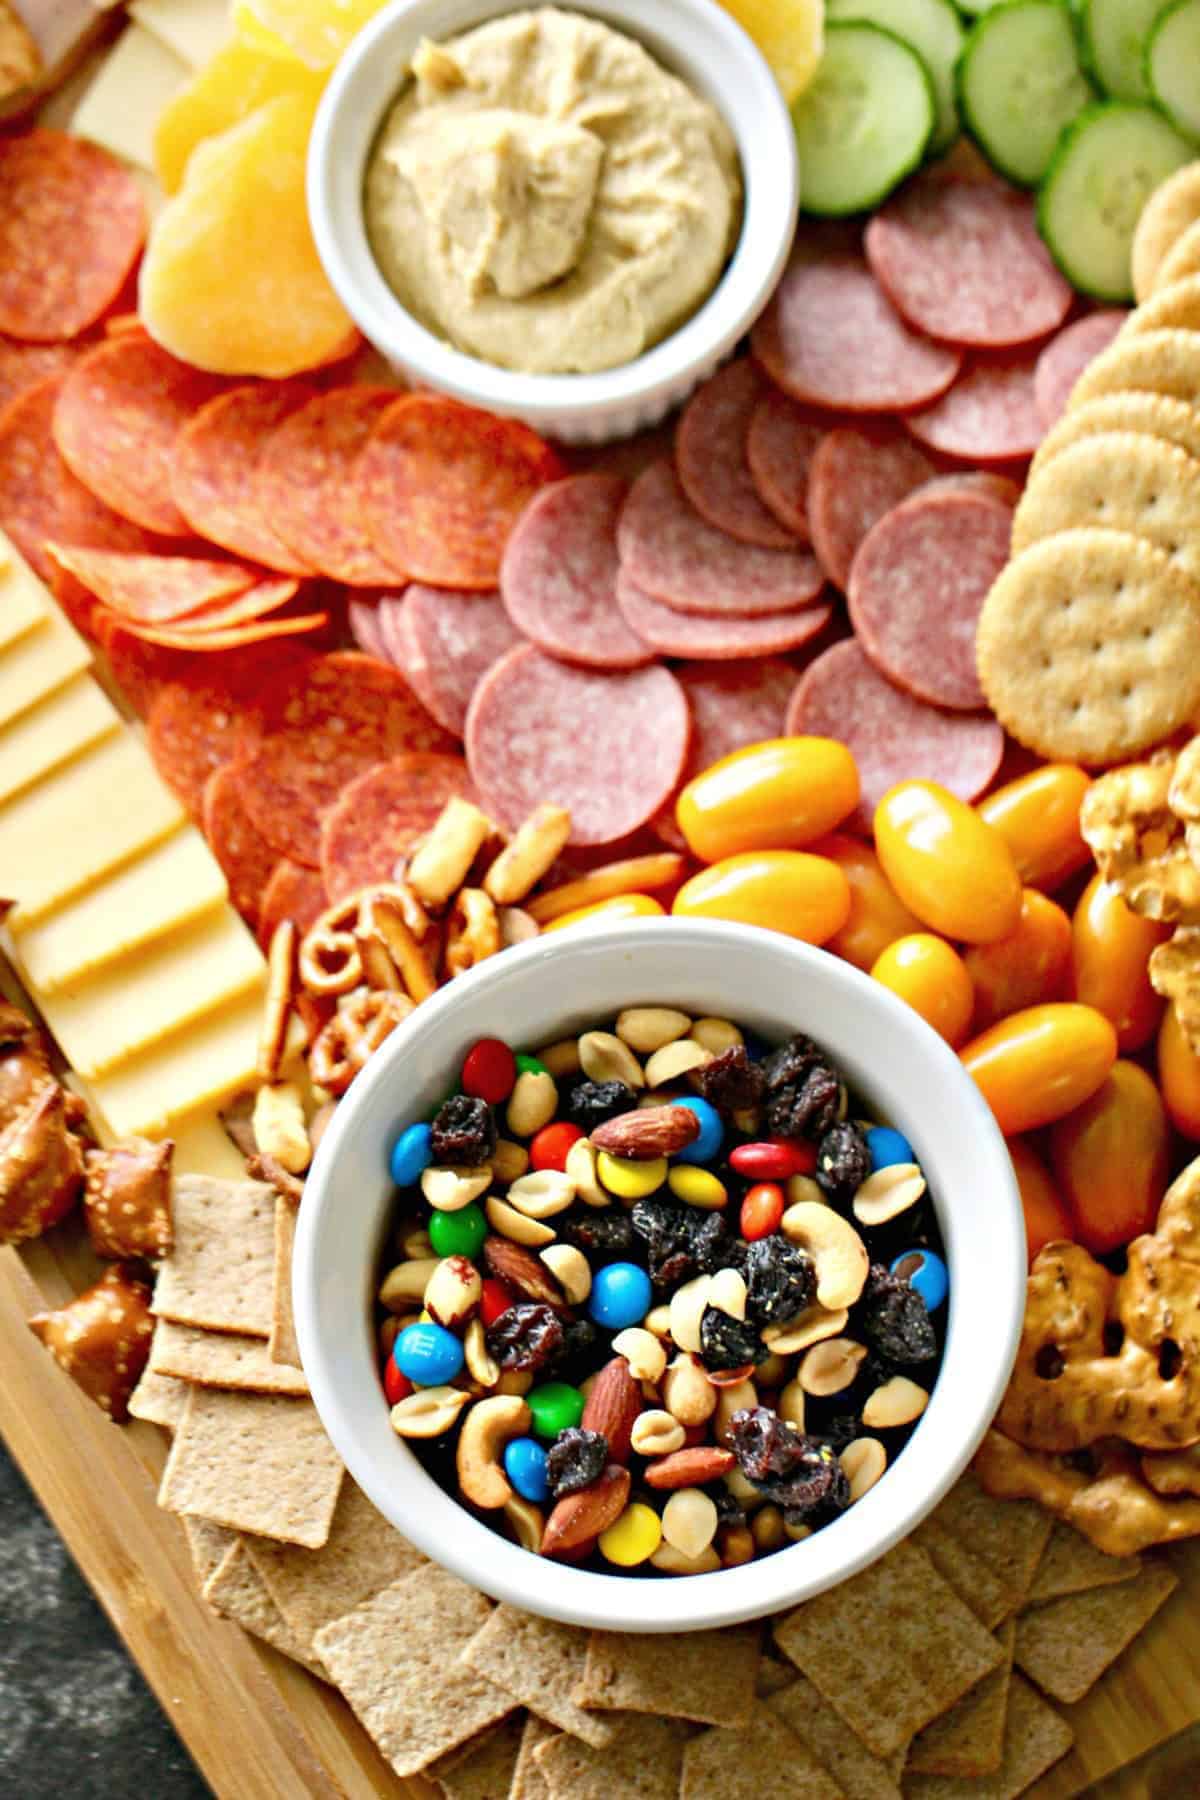
- Meats: Sliced deli meats of the following: ham, chicken, turkey, pepperoni, salami.
- Vegetables: baby carrots, cucumber slices, grape tomatoes, red pepper slices, green pepper slices.
- Crackers: Wheat Thins, Ritz Crackers, pretzels, pita chips.
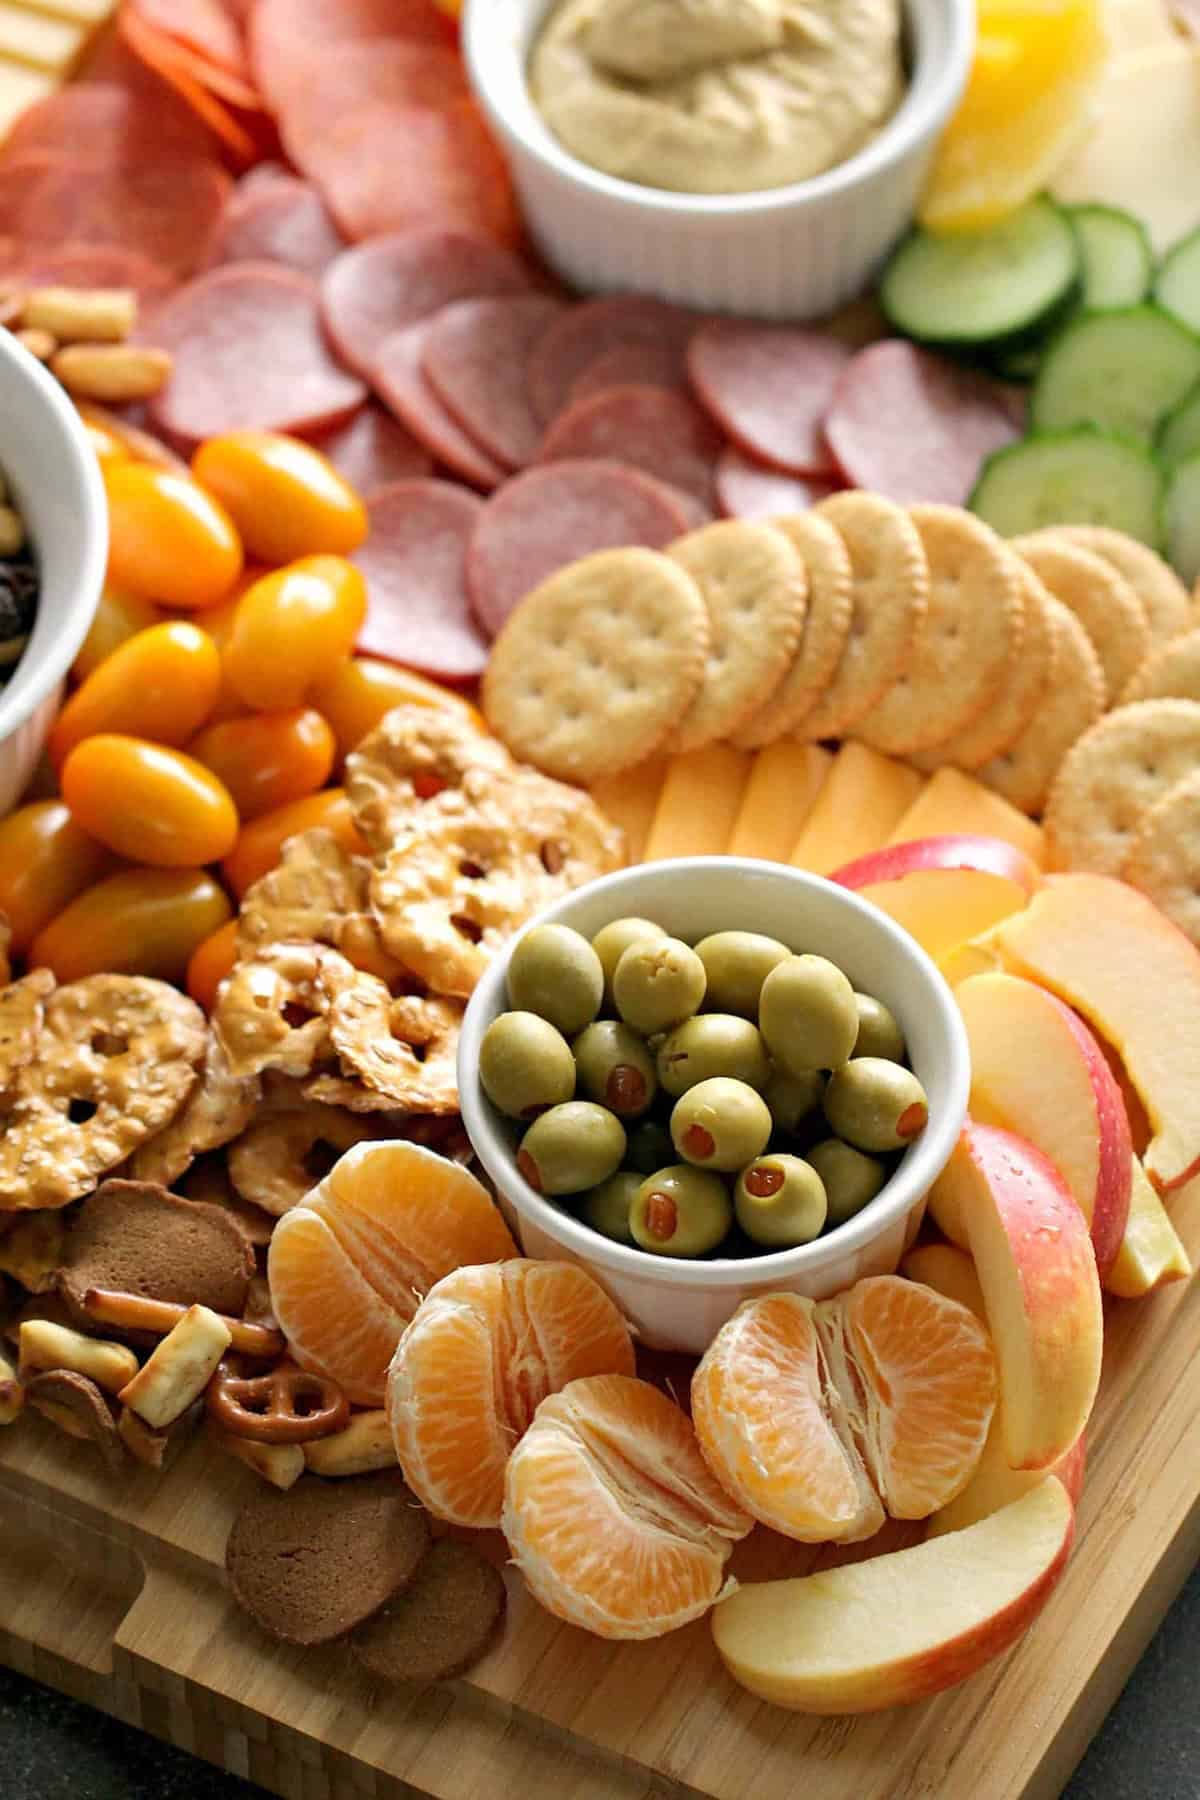
- Other fillers: black olives, green olives, trail mix, apple slices, orange slices, peanut butter-filled pretzels.
Equipment Needed
For this recipe, you only need a few simple kitchen tools. We recommend using the following equipment:
How to Make a Kid-Friendly Charcuterie Board
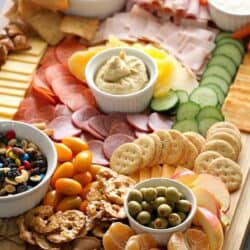
- Grab a board or platter. Before you go out and purchase a fancy board, I would recommend looking around your house. Even a big cutting board works perfectly (that is actually what I used). This cutting board is very similar to the one that I used in the picture. Another idea is to use a large platter – just anything that is a large flat surface will work great!
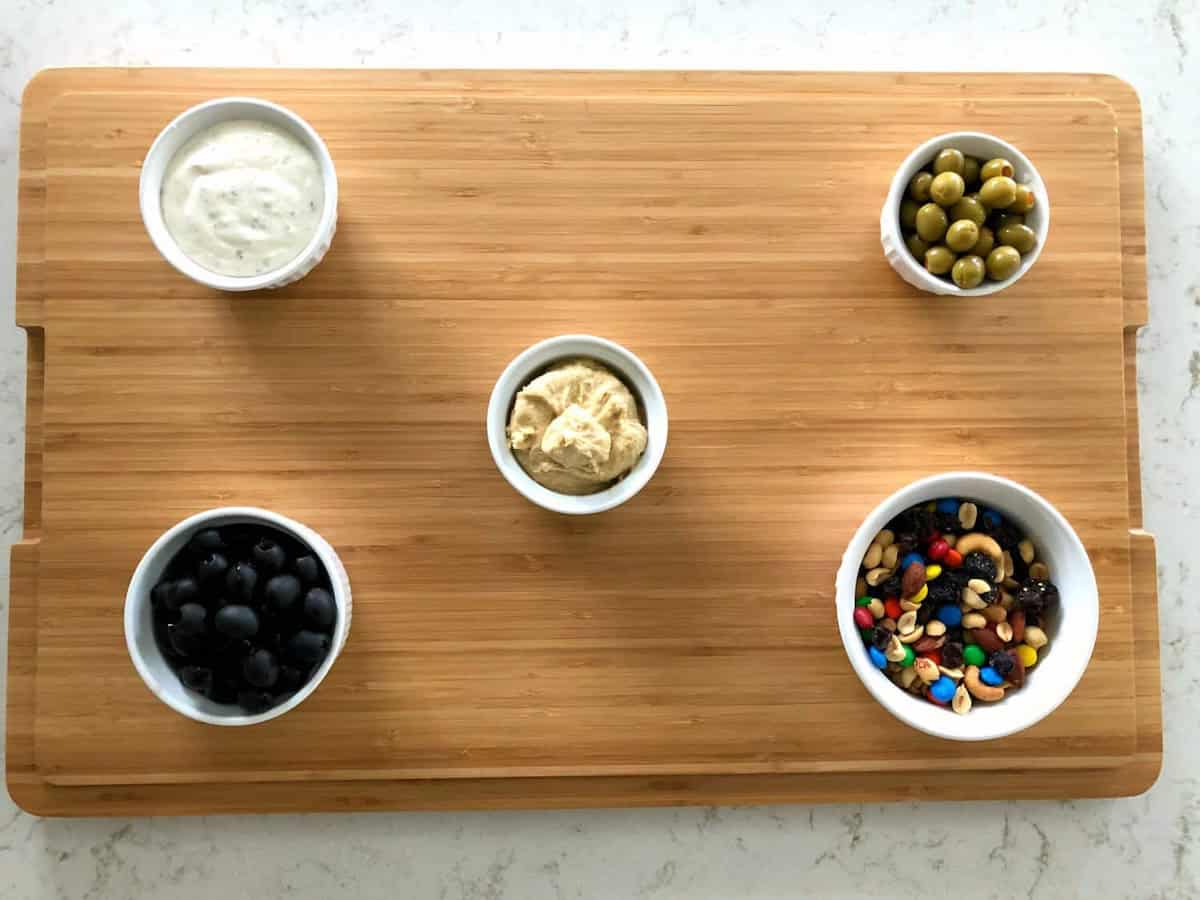
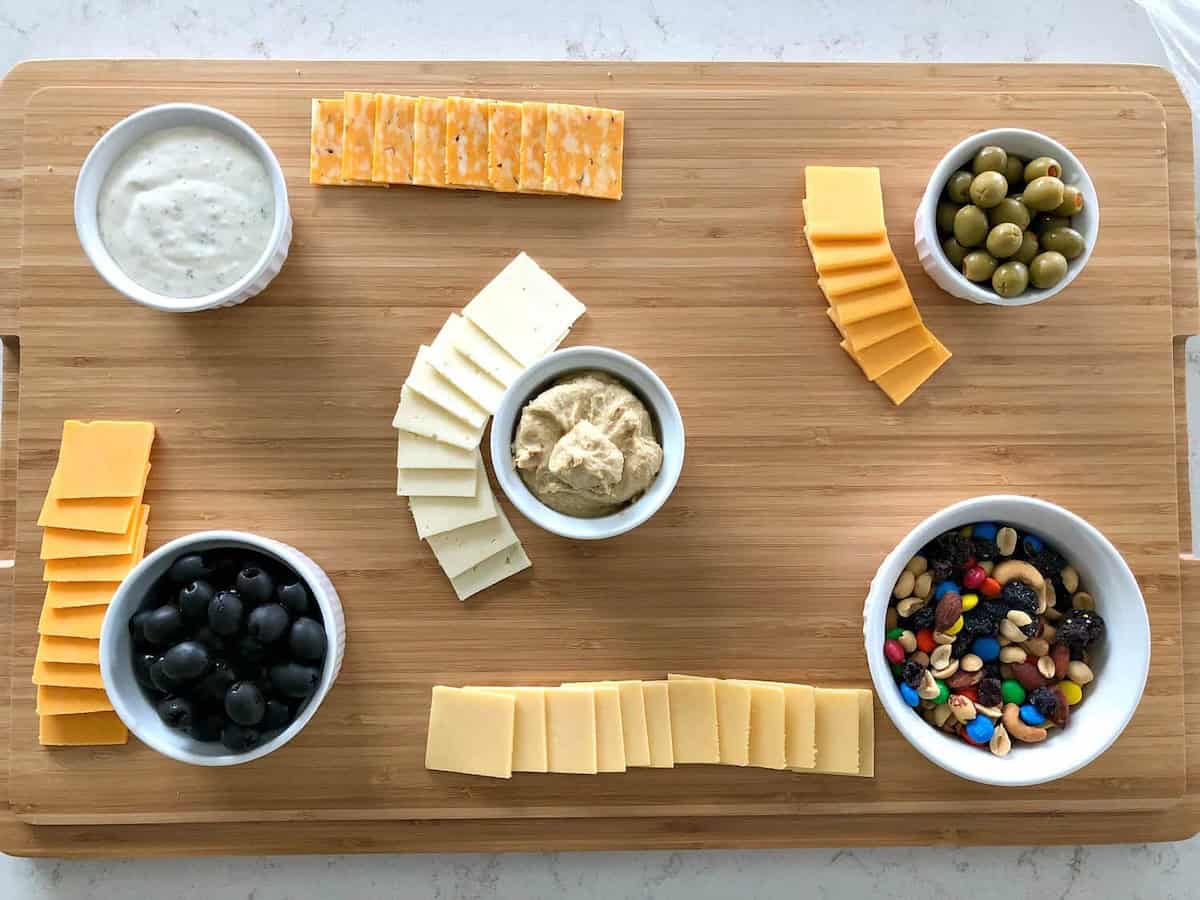
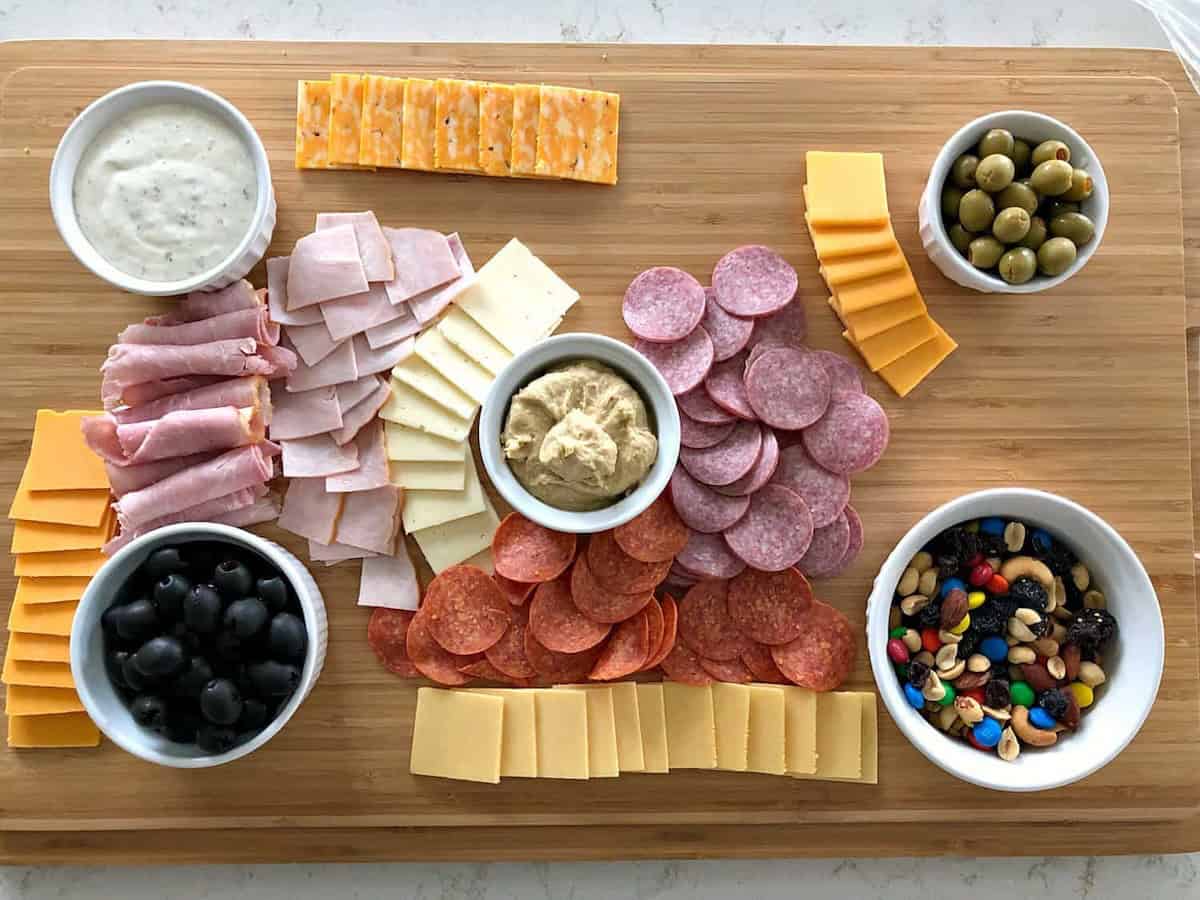
- Start with foods that need to be contained to a bowl, such as dips and hummus. Place some black and green olives in bowls. Trail mix is also best served in a bowl. All of these items would roll away if they were not in a bowl on the board. The bowls that I used are actually small ramekins, a little dip will go a long way. Use bigger bowls if you plan on serving more people. I wanted the bowls to be spread out, so I put a bowl in the middle of the board and then a bowl in each corner.
- Spread out the cheese. My grocery store sells cracker cuts over in the deli, so it made my life easy to just pick that up. If your store does not sell cracker cuts, you can make your own. Just buy a few blocks of cheese and cut them into the size of a cracker. You can use any type of cheese your family or guests will like.
- Add the meats. To keep with the kid-friendly theme, select meats your kids will like. Thinly sliced ham and turkey breast work well, as well as pepperoni and salami. Cut turkey into squares the same size as the cheese. With ham, you can roll them up.
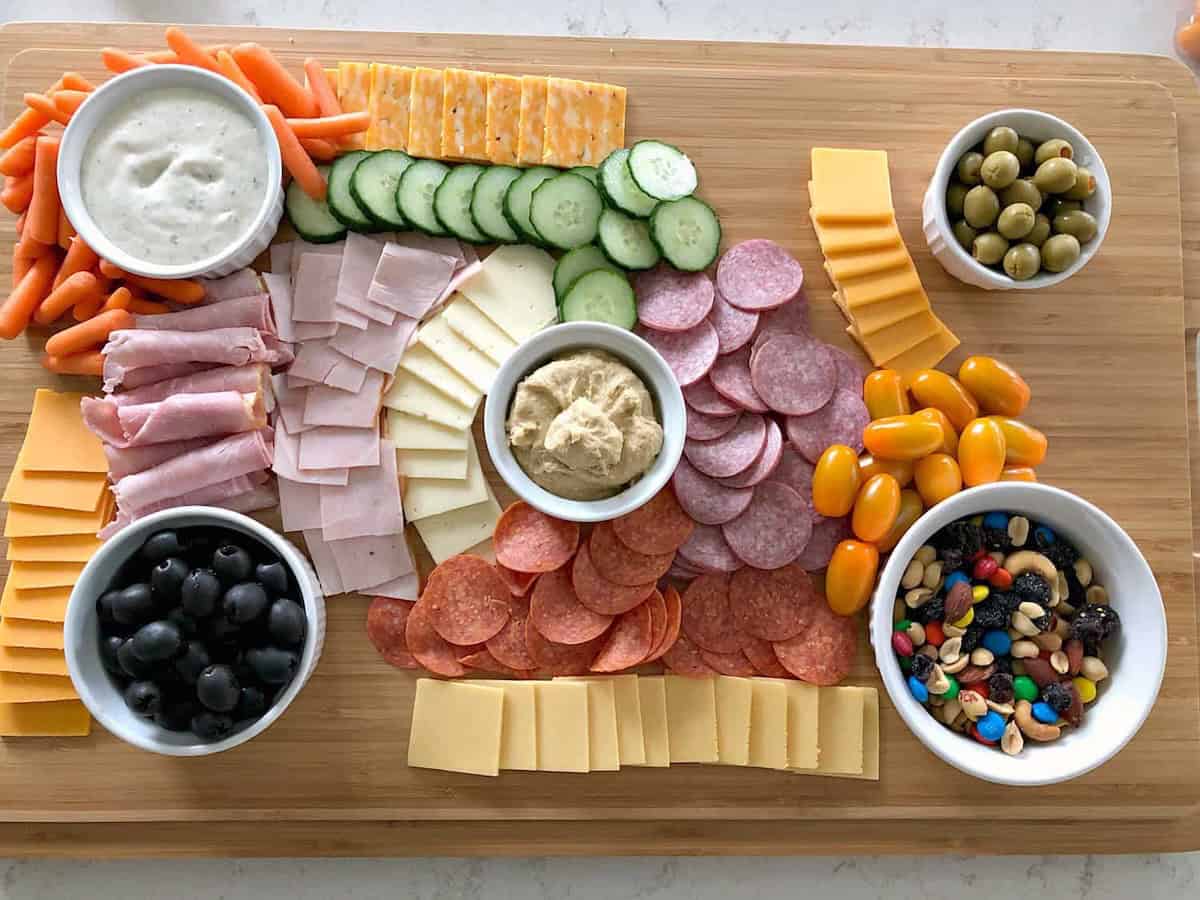
- Add some vegetables. Any vegetables will work here, but I selected vegetables I know my kids will eat – baby carrots, sliced cucumbers, and grape tomatoes.
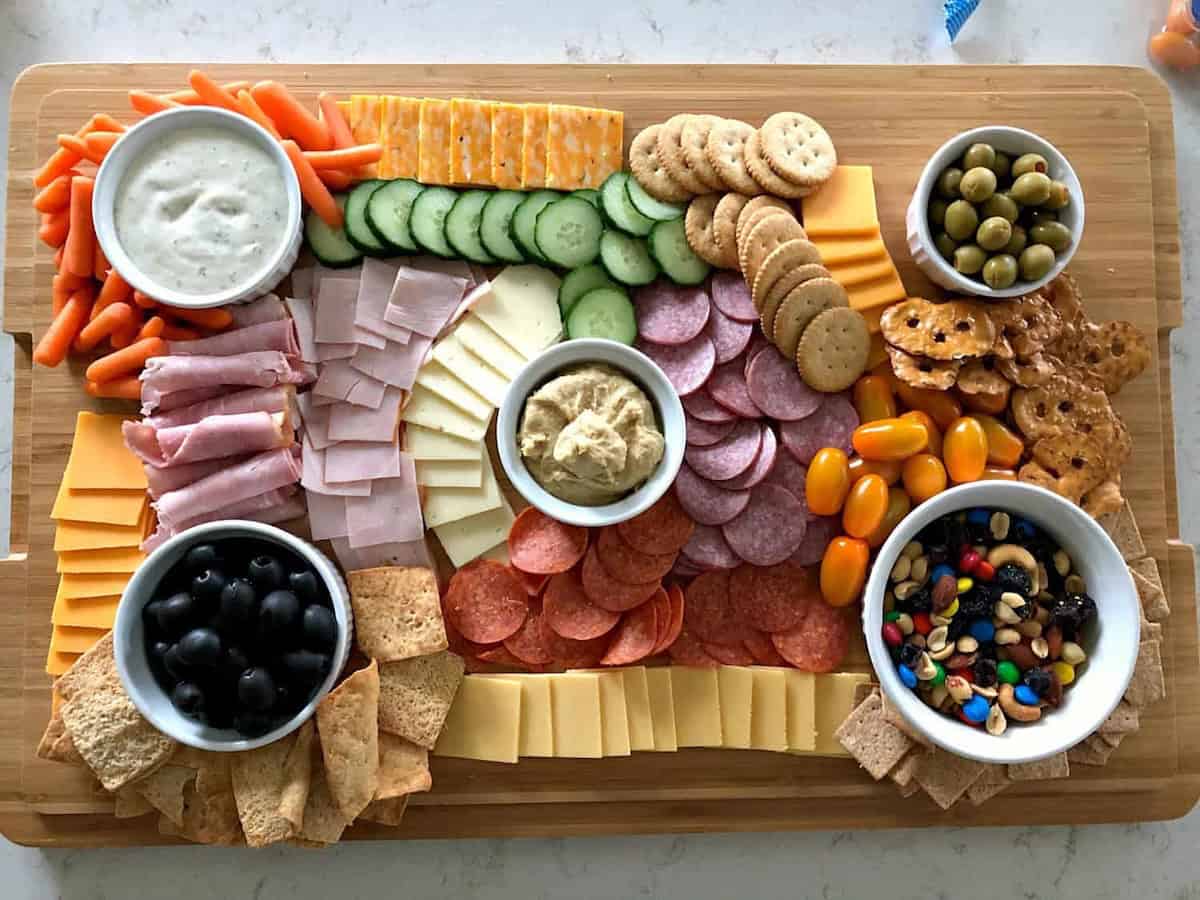
- Add the crackers. No charcuterie board is complete without crackers. I use a few different types to add variety – Wheat Thins, Ritz Crackers, pita chips, and pretzels.
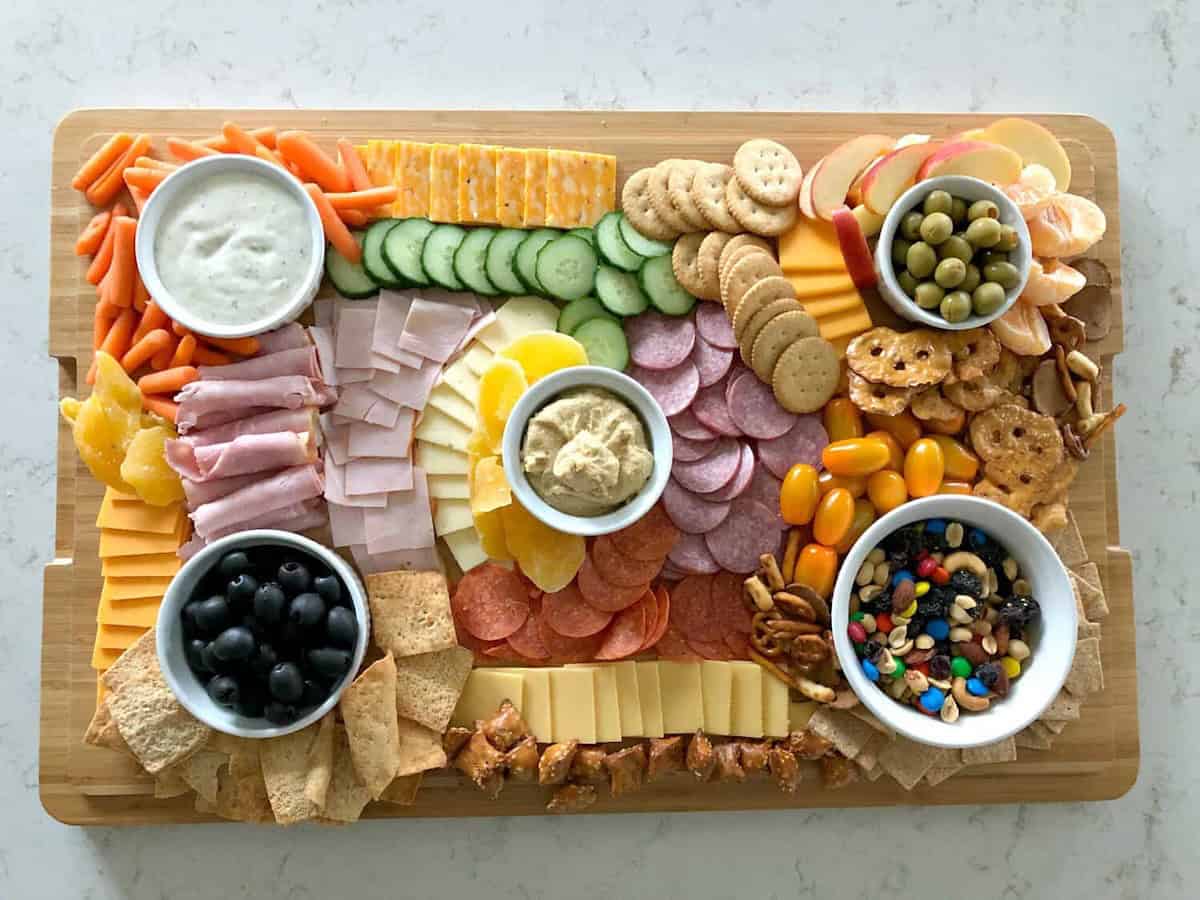
- The Finishing Touches (aka “the fillers”). Now, you just have to fill in any remaining holes on your board. I use sliced up apple, peeled small oranges, and dried mango. I also had some peanut butter filled pretzels, so I threw those on the board too.
- And there you have it! Your charcuterie board is ready to eat!
Recipe Notes
Nutritional information for charcuterie boards depends on what you include and how much; therefore, it is difficult to calculate.
Make sure everything on the board will be safe to eat at room temperature, as it will be out for one to two hours.
Other items you can include on your charcuterie board include the following:
- Cheeses: String cheese, any kind of cheeseball, goat cheese.
- Fruits: Fresh berries, grapes, dried apricots, dried cranberries.
- Dips: Salsa, guacamole, flavored mustards.
- Vegetables: Pickles, sliced celery, sliced bell peppers, mini bell peppers, chopped broccoli, chopped cauliflower, sugar snap peas.
- Proteins: Prosciutto, hardboiled eggs, deviled eggs.
- Breads and crackers: Sliced baguettes, pretzel sticks.
Storage Suggestions
Once you’re done with the board, you can wrap the leftovers with plastic wrap and throw it in the fridge. Depending on the kinds of cheeses and food, you will need to determine how long it can last before going bad.
Enjoy More Delicious Cold Appetizers
We love how cold appetizers can be made-ahead and require very little prep work. Browse our comprehensive list of time-saving cold appetizer recipes.
- Chicken Pinwheels
- Chicken Taco Roll Ups
- Classic Bruschetta
- Classic Deviled Eggs
- Jalapeno Popper Deviled Eggs
- Loaded Deviled Eggs
- Mexican Tortilla Wrap Roll-Ups
- Mini BLT Bites
- Thanksgiving Turkey Vegetable Tray
- Zucchini Feta Bruschetta
Kid-Friendly Charcuterie Board
Ingredients
Dips
- Ranch Dressing
- Hummus
Cheeses
- Swiss Cheese
- Sharp Cheddar Cheese
- Gouda Cheese
- Havarti Cheese
- Pepper Jack Cheese
Meats
- Ham Slices
- Turkey Slices
- Pepperoni Slices
- Salami Slices
Vegetables
- Baby Carrots
- Cucumbers, Sliced
- Grape Tomatoes
Crackers
- Wheat Thins
- Ritz Crackers
- Pretzel Chips
- Pita Chips
Other fillers:
- Black Olives
- Green Olives
- Trail Mix
- Apple Slices
- Orange Slices
- Peanut Butter Filled Pretzels
Instructions
- Grab a board or platter. Before you go out and purchase a fancy board, I would recommend looking around your house. Even a big cutting board works perfectly (that is actually what I used). This cutting board is very similar to the one that I used in the picture. Another idea is to use a large platter – just anything that is a large flat surface will work great!
- Start with foods that need to be contained to a bowl, such as dips and hummus. Place some black and green olives in bowls. Trail mix is also best served in a bowl. All of these items would roll away if they were not in a bowl on the board. The bowls that I used are actually small ramekins, a little dip will go a long way. Use bigger bowls if you plan on serving more people. I wanted the bowls to be spread out, so I put a bowl in the middle of the board and then a bowl in each corner.
- Spread out the cheese. My grocery store sells cracker cuts over in the deli, so it made my life easy to just pick that up. If your store does not sell cracker cuts, you can make your own. Just buy a few blocks of cheese and cut them into the size of a cracker. You can use any type of cheese your family or guests will like.
- Add the meats. To keep with the kid-friendly theme, select meats your kids will like. Thinly sliced ham and turkey breast work well, as well as pepperoni and salami. Cut turkey into squares the same size as the cheese. With ham, you can roll them up.
- Add some vegetables. Any vegetables will work here, but I selected vegetables I know my kids will eat – baby carrots, sliced cucumbers, and grape tomatoes.
- Add the crackers. No charcuterie board is complete without crackers. I use a few different types to add variety – Wheat Thins, Ritz Crackers, pita chips, and pretzels.
- The Finishing Touches (aka "the fillers"). Now, you just have to fill in any remaining holes on your board. I use sliced up apple, peeled small oranges, and dried mango. I also had some peanut butter filled pretzels, so I threw those on the board too.
- And there you have it! Your charcuterie board is ready to eat!
Notes
- Cheeses: String cheese, any kind of cheeseball, goat cheese.
- Fruits: Fresh berries, grapes, dried apricots, dried cranberries.
- Dips: Salsa, guacamole, flavored mustards.
- Vegetables: Pickles, sliced celery, sliced bell peppers, mini bell peppers, chopped broccoli, chopped cauliflower, sugar snap peas.
- Proteins: Prosciutto, hardboiled eggs, deviled eggs.
- Breads and crackers: Sliced baguettes, pretzel sticks.


What a cool idea for a TV Football afternoon. I am definitely going to do this.
Such a great idea. Thank you so much for showing how it’s done and all the suggestions.
Fantastic idea for grazing all day! How long would you leave this out without it spoiling? Ranch makes me nervous when left out too long.
It’s safe for about an hour. Any longer and we stick it in the fridge. The kids just help themselves.