We are so excited to share with you one of our favorite finds . . .
Wood Creations is a craft store like no other- they specialize in unfinished wood crafts for all seasons and for every room in your home.
There are so many creative people out there who can come up with fun crafts like this on their own and have the tools to make it happen. However, without a fancy wood saw and a creative idea, it’s hard to do. Wood Creations takes care of all the work- you just get to do the fun part!
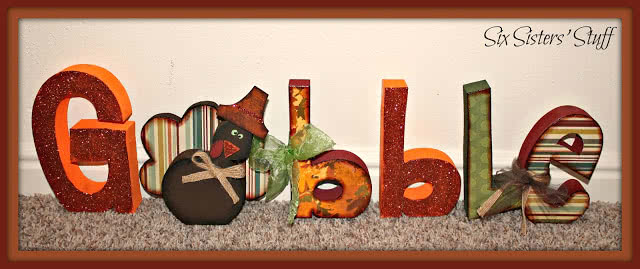
Today I wanted to share with you how I decorated this cute “Gobble” for Thanksgiving.
When you head into Wood Creations, you will see shelves loaded with unfinished wood designs. There are seriously so many fun projects and crafts that you don’t know where to start. I think that I walked around the store for 30 minutes before finally deciding which craft to take home that day (okay, I will be honest- I think that I walked out of there with about 4 crafts).

They have a finished example of each craft so you get an idea of what you could have it look like, but I love putting my own spin on it.

So besides just the unfinished wood crafts, you can pick up all the other craft supplies you will need to make your project. To make this “Gobble”, I used Mod Podge, a couple colors of acrylic paint (orange, brown, green, maroon, and black), glitter, chalk, paper, paintbrushes, tulle, and ribbon (all of which I was able to pick up at Wood Creations- it’s like one-stop craft shopping!)

The first thing that I did was paint all the wood. You could paint the whole project the same color or paint each individual letter/shape it’s own color (which is what I did). You could stop here and just have it be painted, but there are so many fun ways to spice it up . . .

With all the patterned paper that I got, I traced the shape onto the paper and cut it out. You will want to cut your paper just a tiny bit smaller than the actual shape so that the paper doesn’t hang over the edge.

I then painted a thin layer of Mod Podge on the shape and placed the paper onto the Mod Podge.

Then paint another layer over the paper and allow it dry completely.

The letters looks darling left with just the paper on, but to add even more dimension, I buffed a little bit of chalk around the edges of each letter and I loved the way it turned out.
The glitter is just as easy to apply- just paint the surface you want to cover with Mod Podge and completely cover the Mod Podge with glitter. Shake off the access and allow it dry completely.
After it was all dry, I tied some ribbons and tulle around the letters and I am thrilled with my finished project!
If you would like to visit the Wood Creations store in Utah, you can find all their location information on their website. They also host craft nights at the store where you can make your project in the store with professionals to help you, so be sure to check those out. It makes for a fun girls night out!
Don’t live in Utah? Don’t worry!
Wood Creations now SHIPS!!!
I know that a lot of you have asked where you can purchase items like this outside of Utah and we are so thrilled to share their online store with you! Fall and Thanksgiving items are available in their online store right now and Christmas will soon be released! If you have any questions, be sure to check out their website and their blog.


Questions & Reviews
Comments are closed.